 Aloud In The Cloud
So you want to know how to start simple blog in 2023?
I believe that everybody should be able to set up their own simple blog with little to no technical knowledge. Without coding!
By the time you are done going through this short tutorial, you should have your blog up and running with your own custom domain.
NOTE: If your are looking to rather create a simple website(instead of a blog), then try this short guide: How To Create Simple Website
Start Simple Blog In 2023 - Steps To Follow
- Choose a domain name (eg www.aloudinthecloud.com)
- Blog Platform to use (eg, Wordpress, Joomla etc)
- Setting Up/Configuring your blog
- Add content to the blog
1. CHOOSE A DOMAIN NAME (Name of your blog)
In order for people to reach your blog, they will need to know the name. Try and choose a name that is unique, memorable and hints at what the blog is about. For the purposes of this tutorial, we will use the name aloudinthecloud.com as the domain name.
Please note that if you don’t desire a unique or custom name, you are better off using any other free online publishing platform available(eg. wordpress.com)
These free publishing platforms allow you to publish on their platform by creating an account.
Your blog will end up with names like myownblog.wordpress.com or mybusinessblog.wordpress.com.
Such names don’t look professional and also don’t rank well in search result(meaning people will struggle to find your site). :(
Register Your Chosen Domain
Once you decide you need your own custom and unique name/domain(eg. aloudinthecloud.com), you must proceed to register the name. This is called Domain Registration.
But before you register your domain you must also consider where you will want to store your blog content(articles, images etc). This is called Web Hosting.
Luckily, most domain registrars can also store (i.e. host) your blog for you!
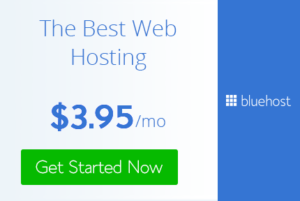
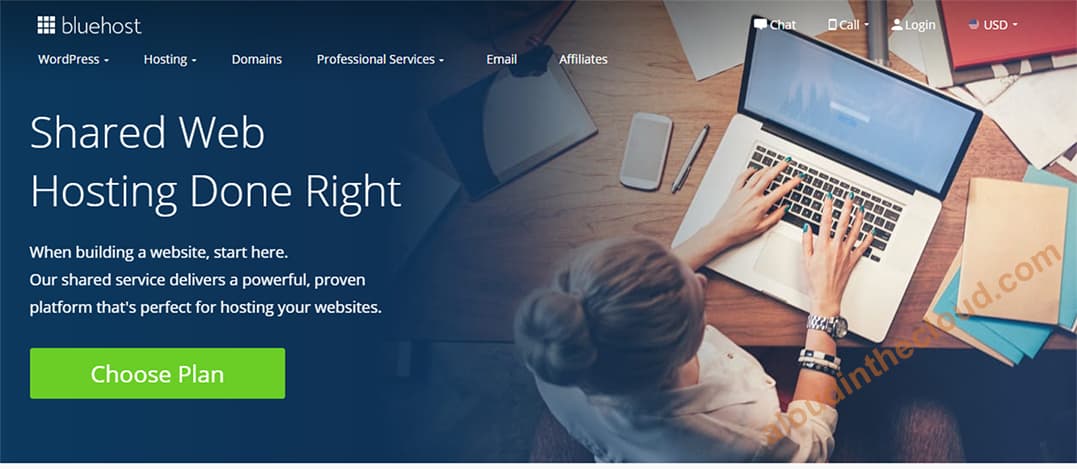
There are several Domain Registrars available but from our experience, we will recommend BLUEHOST
Here’s the KICKER! When you buy hosting(about \$4 per month) from BLUEHOST, you get domain name registration for FREE!!!
They also secure your website with SSL certificate for FREE!!
Once you come up with your unique, cool blog name please proceed to register it above so someone else doesn’t get to register it before you.
Disclaimer: We get a small commission to help us pay for server cost when you click some of the links in this post and proceed to make a purchase.
Steps to Sign up
- Once on Bluehost, select ‘Wordpress‘ on the top left of page and select ‘Wordpress Hosting’
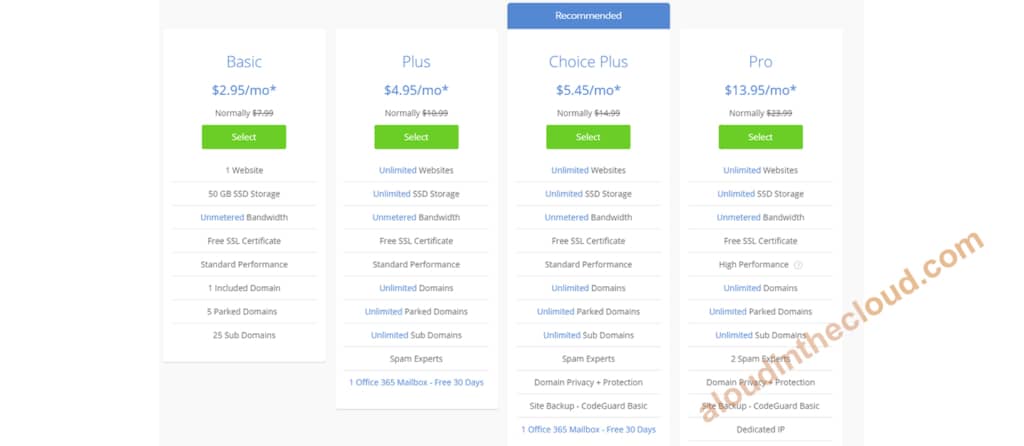
2. Select the hosting plan. We will go with the Basic plan for now.
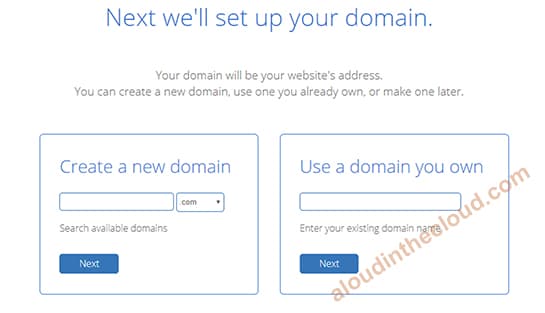
3. Create A New Domain
I will advise you go with the much simpler .com extension(the default) or you can choose any of the listed ones from the dropdown when you click the small arrow beside the .com
Note: If you already have a domain, use the second box.
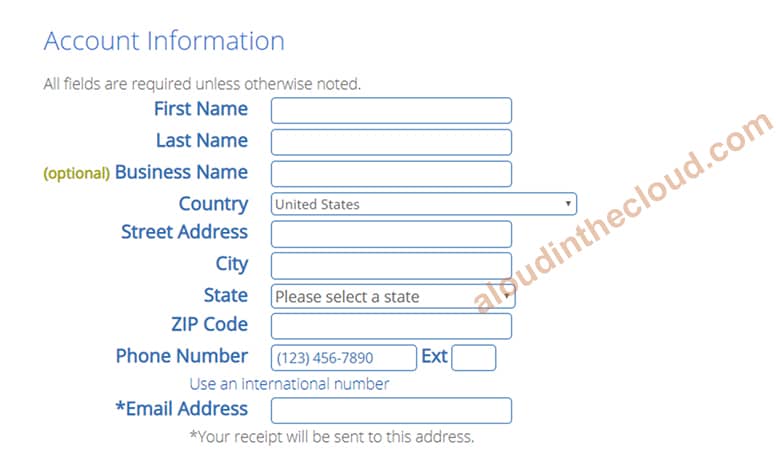
3. Create Account
Enter your contact and billing information here and click next
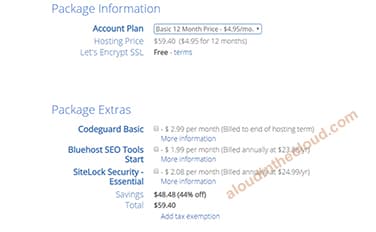
4. Enter the hosting package information
NOTE: The cost per month gets cheaper the longer your commitment. Decide which one suits you.
Uncheck all other options under Package Extras. We will not need those for now.
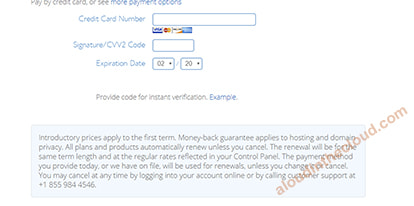
5. Enter your payment details to complete the transaction.
Once you are done with this, Bluehost will proceed to install your blog platform(ie Wordpress) for you!! Awesome, right?
Now that you’ve seen the steps, we’ll wait. Go register(if you’ve not already done so) and come back here.
Take note of your Bluehost login details(i.e. username and password)
2. WORDPRESS AS A BLOG PLATFORM TO USE
There are various blog creation platforms available. We have Wordpress, Joomla, Drupal and a host of others including cloud based ones.
However, from our experience, Wordpress offers the best options. It is popular, flexible and powers more than 30% of the web. This means when you run into any issues you can be sure help will always be available somewhere online.
So we will go with Wordpress.

Installing Wordpress
NOTE: You should have installed Wordpress from the steps above when registering your domain name. Otherwise you can still follow the steps below
This step is surprisingly one of the simplest in this tutorial.
We will make use of Bluehost’s 1-Click Installation process.
Log in to your Bluehost account(the log in link will be at the top right of the homepage).
You will see 1-Click-Installation in your control panel. Use that to install your Wordpress platform.
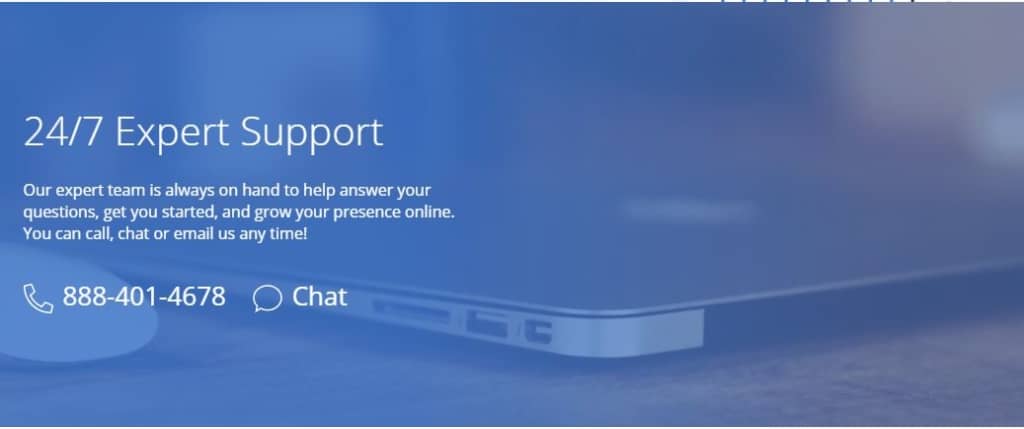
TIP: If you ever get stuck performing any of the following steps, the Bluehost tech support will gladly help you. They are one of the best in the business! Go to the Bluehost homepage, scroll down and you’ll see 24/7 Expert Support section. Click on the Chat link to get help!!!
Another bonus for being a Bluehost customer ;)
3. SET UP/CONFIGURE YOUR WEBSITE
Once you are done installing Wordpress, it’s time to set up the look and feel of your awesome site. The look and feel of a Wordpress site is controlled through what we call a THEME. Wordpress by default comes with a theme and you may choose to go with that or there are thousands of FREE and PREMIUM themes to choose from. Several sites mythemeshop, themeforest, elegantthemes offer free and paid themes.
If you decide you want full control of your themes, you may have to go for a paid/premium theme.
We will recommend the themes available at MYTHEMESHOP. Their themes are affordable, fast and user friendly.
Again, don’t hesitate to contact Bluehost Tech Support if you get stuck.
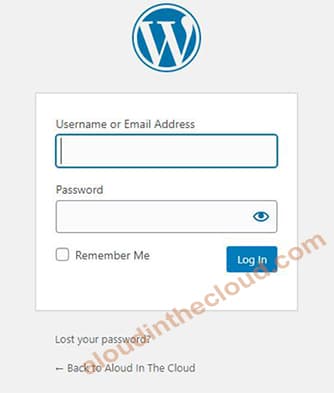
You’ll have to log into your Wordpress site to start your configurations.
The log in page of your site will be found at www.yoursitename.com/wp-admin (eg. aloudinthecloud.com/wp-admin).
Enter your username and password to log in. (Contact support if you can’t remember your credentials).
NOTE: You can also log into your wordpress dashboard by logging into Bluehost(using your Bluehost credentials) then selecting your site from there.
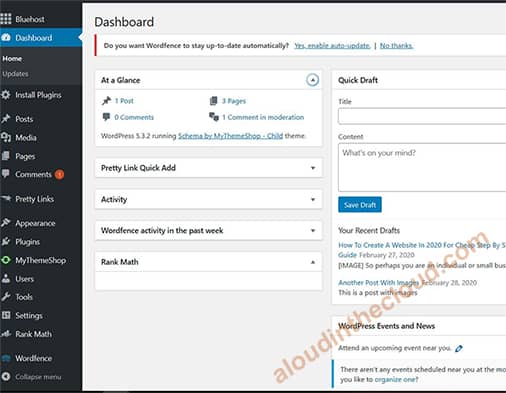
Once you successfully log in, you will be taken to your Wordpress dashboard where an overview of your setup is displayed(no. of pages, posts, plugins installed etc). As you continue on your wordpress journey you’ll become familiar with this view and get to know what plugins, widgets, posts, pages etc all are.
Your Wordpress dashboard is your engine room. This is where you control everything.
Installing Your Wordpress Theme
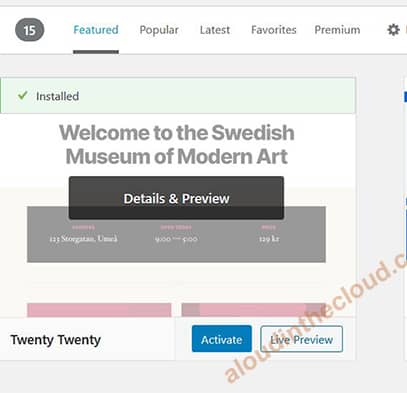
On the left side are your dashboard menus. Hover over ‘Appearance‘ then click ‘Themes‘ to open the Themes page.
Here, you’ll find the list of available themes.
Click on Add New button or scroll to the bottom of the theme list and click Add New Theme.
Here, you can see the themes that you already have installed, you can also search for new themes.
When you click on Feature Filter button at the top, you can filter out the desired features you want in a theme by Subject Matter, Layout or feature.
To install a theme, hover over the theme’s image and click Install.
TIP: Note that you can preview a theme before installing it.
Once the theme is installed, you can hover over it and click Activate to use that theme on your awesome site.
4. CREATE PAGES FOR WEBSITE
Hurray! Now that your blog’s look and feel is done, you can now create the pages and posts for the blog.
Most blogs have Contact Us and About Us pages. Let’s create those!
There are two main ways to create content in Wordpress. You create content using either Posts or Pages.
What’s the difference between Posts and Pages?
Wordpress was originally mainly used for blogging, where users post content at regular intervals. These contents are displayed in reversed chronological order and usually have timestamps or name of author. These are called Posts(ie blog posts).
Pages on the other hand are used for static or fixed content(eg. Contact Us, About Us, Product List, Disclaimer pages).
By default, a newly installed Wordpress displays the list of blog posts(in reversed chronological order) on the homepage of the site. If you prefer this behaviour, you can proceed to learn how to create posts and have them automatically listed on the site’s homepage.
For the purposes of this guide, we will demonstrate, later in this guide, how to customize the homepage with your own custom page and have your list of blog posts(if any) displayed on a separate page/link(instead of the homepage).
NOTE: The new version of Wordpress has a new editor called block editor. While some prefer this, I personally like the old classic editor.
So before we begin adding content, let’s install the classic editor plugin and use that instead of the block editor.
The following steps will also show you hot to install Wordpress plugins in general.
Installing Classic Editor Plugin
- Click on Plugins on the left dashboard menu. This opens the plugin page
- Click Add New(at the top)
- At the right search field type ‘Classic Editor’
- Click on Install on the Classic Editor search result
- Click Activate to install the plugin
This is the same process for installing all other plugins.
Creating Blog Pages
- Hover over the Pages link on the dashboard menu. Click Add New
- This opens a text editor with a Title and Content fields
- Populate this fields with your desired content. You can preview your work by clicking ‘Preview‘ on the right side bar of the editing window under Publish section.
- In this edit window, you can add images, videos and other media types by clicking Add Media(top left button) and uploading the file.
- Once done, click Publish also under Publish section.
Repeat this process for all other pages you may want to create. Then click Launch Site to make your site available to the public.
Creating Blog Posts
Since this is a blog, you will have to create your specific entries as a post(instead of a page).
The process is similar to creating Pages
- Hover over the Posts link on the dashboard menu. Click Add New
- This opens a text editor with a Title and Content Fields
- Populate this fields with your desired content. You can preview your work by clicking ‘Preview’ on the right side bar of the editing window under Publish section. Once done, click Publish also under Publish section.
- In this edit window, you can add images, videos and other media types by clicking Add Media(top left button)
- Once done, click Publish, also under Publish section.
When a visitor comes to your blog, your posts will be listed in reversed chronological order(ie latest blog post first) on your homepage.
Managing Your Site’s Menu
How well you organize your links can determine if your visitors find it easy consuming the content on your blog. You can create custom menus and choose which links to place on them. Good navigation is important!
Wordpress themes come with a default set of menus. We’ll show you how to customize menus for the theme we are using(ie. Schema from mythemeshop.com.
You can check how many menus your chosen theme supports by going to Appearance -> Menus -> Select Manage Locations Tab
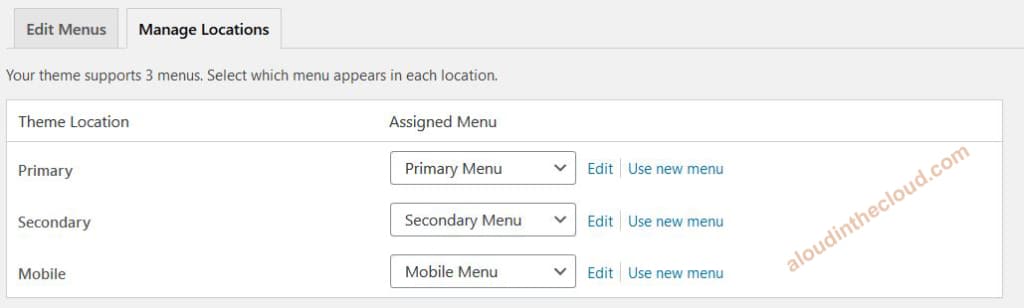
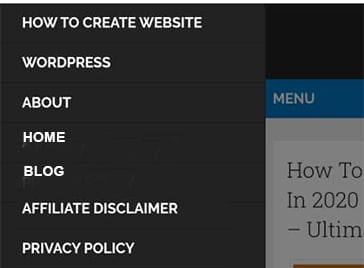
The Schema theme happens to support 3 menus: Primary, Secondary and Mobile(for smaller devices).
This is how the menus are presented on the Schema theme(on non mobile site), with the primary menu at the top.

Adding Links For Navigation
We will demonstrate how to create a menu and add links to it. We then assign this menu to either be the Primary, Secondary or Mobile menu.
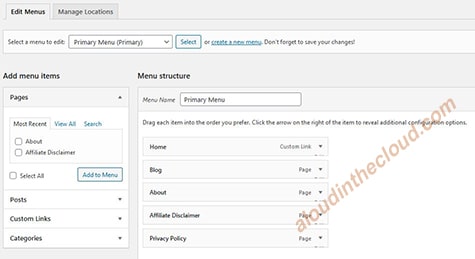
Click on the Edit Menu tab and click Create Menu. Give the menu a name(eg. Primary Menu)

Under Add menu items, you will see Pages, Posts, Custom Links and Categories.
Expand any of these and select the links to add to the menu created above.
Under Menu structure, you can rearrange how the links are displayed on the menu. Click Save menu once done.
Congrats!! You created your first blog!
Next Steps
- Learn more about Wordpress at www.wordpress.org
- Learn more about popular Wordpress plugins and how they can simplify your work.
- Bluehost tech support is your friend!
Conclusion
In this current information age, performing a task like blog creation should be accessible to many people.
This involves a few steps:
- Choose and register your blog name (bluehost preferred)
- Select the platform on which to create the blog(wordpress preferred)
- Set up or Configure the blog
- Create content for the website (You can get additional help on wordpress from www.wpbeginner.com)
If you find this guide useful, kindly share it with your friends via email, social media so that they can also benefit.
If you need assistance with any of the following steps contact us 
- SKS
Check out our other guides
- How To Create Your Own Online Portfolio
- How To Make Your Resume Stand Out
- How To Create A Simple Website
Disclaimer: We get a small commission to help us pay for server cost when you click some of the links in this post and proceed to make a purchase.
Comments
comments powered by Disqus