 Aloud In The Cloud
Are you looking to host your business or personal website for FREE and on Google of all places?
This guide will show you how to host website on Google for FREE!
The advent of cloud technologies has simplified or in some cases completely eliminated the need for some costly services. Perhaps, you have a small business or you just want to host your resume online and you are looking to host website with your contacts and business information for your potential customers.
In such simple cases, there will be no need to pay for web hosting at all. All you will pay for is your domain name(ie your website address eg. www.mybusiness.com and that’s about $10 per year). The actual web hosting or where to store you site you can get for FREE. This is what this guide is about.
How does Google Cloud work?
How much does Google Cloud cost?
How much of Google Cloud storage is FREE?
These are some of the questions we keep getting about Google Cloud platform from people who have never used the platform. We hope once you start using the platform, some of these will be demystified. So jump in with this guide!
NOTE: If you actually need a fully functional website(with login, visitor comments, page editor, dashboard etc), you can still create this yourself in a different way except you have to pay monthly(less than $4 per month) for the hosting.
See this step-by-step guide on how to set this up.
These are the steps on how to host website on Google for FREE
1. Register Your Domain
2. Get Your Theme(eg. From Bootstrap Themes)
3. Sign Up For Google Cloud
4. Create Your Storage Bucket
5. Upload Files and Configure
6. Add SSL For Security
Register Your Domain
This is the first step in hosting our free awesome site. We recommend Bluehost for your domain registration. We find them to be the best out there.
Check out our short step-by-step guide on how to register domain name on Bluehost.

Verify Your Bluehost Domain Name
TIP: Once you’ve signed up at Bluehost, if you ever get stuck on any of the following steps, reach out to the awesome Bluehost chat support on their homepage. They are the best!
In order to use the registered domain name with the Google storage bucket we will create later, you need to verify the domain by letting Google know it belongs to you.
IMPORTANT: Make sure you are logged in using the Google account you want to use for this FREE hosting setup on Google.
Step 1: Once you are logged in, go to Google Search Console
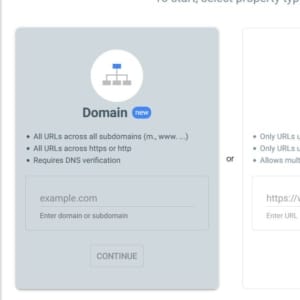
Step 2: If this is your first time and you don’t have any site set up on search console, you will be asked to enter your domain name. Use the first box that says ‘Domain‘. Enter your domain without the www and click ‘Continue‘.
If you have other sites on search console, you can proceed to add the new site by clicking Add Property from the top left corner of the search console page.
Step 3: Retrieve the verification string from search console. A window pops up showing the TXT record to use to verify your domain. Click the COPY button to copy the text.
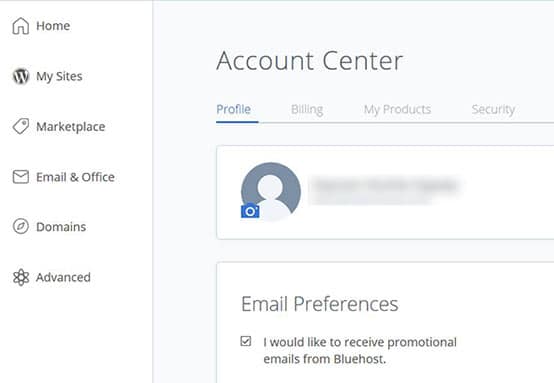
Step 4: Log into your Bluehost account using the credentials you created when you registered your domain name. Once you are logged in, click on Domains on the left.
Step 5: Click on ‘Manage’ against the domain name you want to verify. This opens the domain name details page.
Step 6: Scroll down to the TXT (Text) section. Click Add Record.
Enter the value “@” in Host Record field
Paste the TXT you copied from search console into TXT Value field(Go back to copy it from search console if you haven’t)
Leave the value in TTL untouched
Click Save

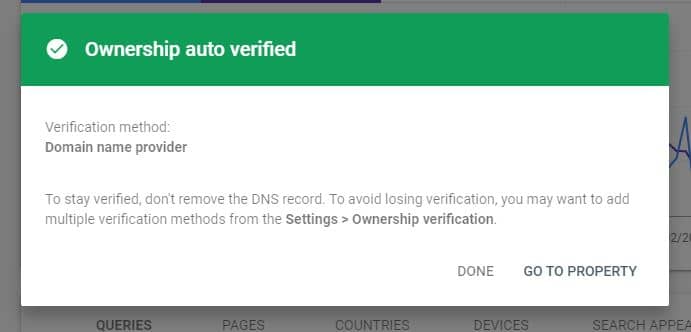
Step 7: Go back to Search Console and click Verify. You will see a success pop-up once verification is successful.
Reach out to Bluehost support if this fails for you repeatedly. You might also have to wait for a while after entering the record on Bluehost.
Get Your Theme(eg. From Bootstrap Themes)
For our example, we will use a free theme from Start Bootstrap. We will use the resume theme for this example. Go to resume theme and click the red Free Download button to download the zipped theme files. Make sure you extract the files ready for upload to Google Cloud in a later step.
Sign Up For Google Cloud
Time to sign up for Google Cloud!! Make sure you are still logged in with the same Google account you used to verify your domain.
Step 1: Go to Google Cloud console. If this is your first time, you’ll be asked to accept the terms. Agree and continue.
Step 2: On the console dashboard, your menus will be on the left. Clicking on the three horizontal icons(ie hamburger icon on the top left) corner hides and displays the menu panel respectively.
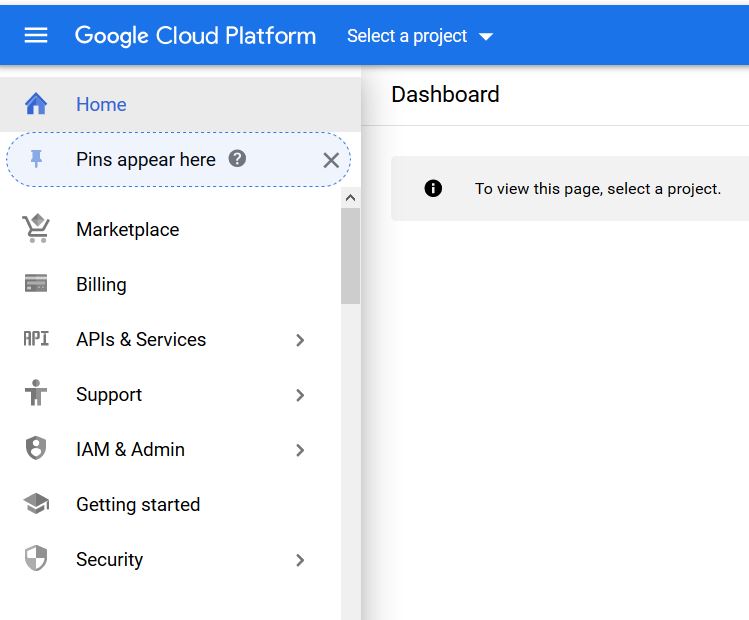
Step 3: Click on Select a project(at the top). If you can’t see this, make sure you’ve clicked Home at the top left of the menu panel.
Step 4: A create-project menu pop-up appears. On the top right corner, click NEW PROJECT. Enter a project name of your choice. Click CREATE and wait for project to be ready.

Step 5: In order to use the FREE resources available, you have to activate the project you just created. Click ACTIVATE at the top right corner. Accept the terms and click CONTINUE.
Step 6: Enter your payment details. Do Not Worry! You will not be charged as evidenced by the message on the right panel. It’s only for verification.
Google says:“We ask you for your credit card details to make sure that you are not a robot. You won’t be charged unless you manually upgrade to a paid account.”
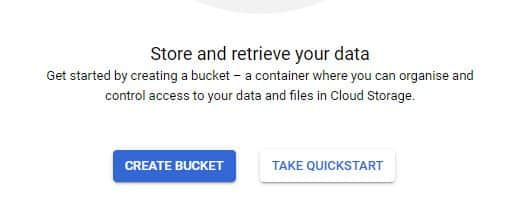
Create Your Storage Bucket
Step 1: Once you are done with sign up, we can now create our storage bucket. Where we will store our website files! On the left menu, scroll down to STORAGE section, click Storage -> Browser. Note: If you can’t see the left menu, click on the hamburger icon(the 3 horizontal icon) on the top left corner.
Click CREATE BUCKET
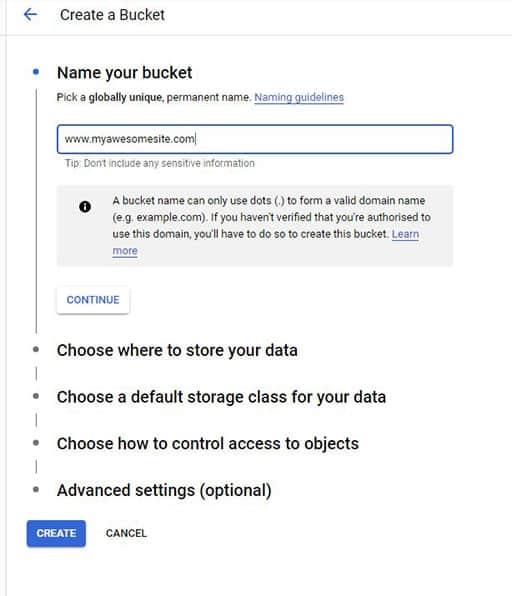
Step 2: This step is crucial. Give the bucket the same name as the domain name you want to use. Make sure it begins with www. Example www.myawesomesite.com. NOTE: At this point, if you have not yet verified your domain name, Google will ask you to verify the domain you entered here.
Under Choose where to store your data select Region.
Under Choose a default storage class for your data, select Standard.
Under Choose how to control access to objects, select Uniform.
Leave the rest of the settings at their default. Click CREATE
Upload Files and Configure
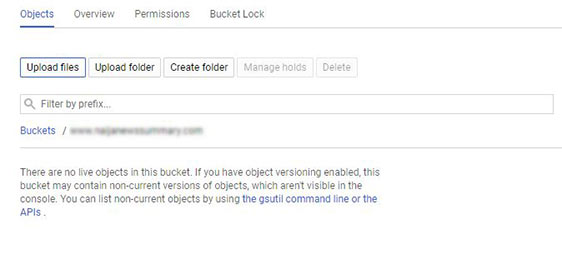
You bucket is now ready.
Time to upload our website files!
You should have your bucket opened after creation. Otherwise, go back to the STORAGE section of the left menu, select Storage -> Browser. Your bucket will be listed on the right. Click your bucket name(ie your domain name) to have it opened.
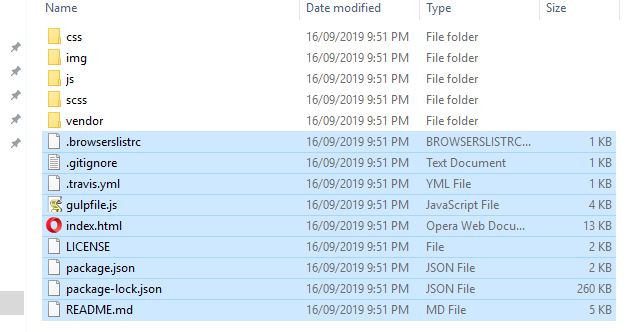
Step 1: Upload your website files and folders. Click on Upload files, navigate to where you downloaded and extracted the Bootstrap resume theme files on your local machine.
Step 2: Select all the files without the folders and upload them. Next, click Upload folder and upload the folders one by one(you can only upload one folder at a time unlike files)
Step 3: Once the uploads are done, you have to configure the bucket to know which file to serve. Go back to STORAGE section, Storage -> Browser to see your bucket listed. Click on the 3 vertical dots at the far end. Click Edit website configuration from the dropdown menu.

Notice under the ‘Public access’ column it says ‘Not public’. This means the site can’t be accessed over the internet. We will address this in the next two steps.
Step 4: Enter index.html in the first field (ie Index (main) page suffix. You can upload a 404 page later if you prefer. This will go into the second field.
Step 5: We are done with setup but our site is not yet accessible to the public. This is because all the files in our storage bucket have a ‘private‘ permission. We need to make them all ‘public‘ in order to make them accessible via the internet.
Go back and click the 3 vertical dots against the bucket name. Click Edit bucket permissions, then click ADD MEMBER button.
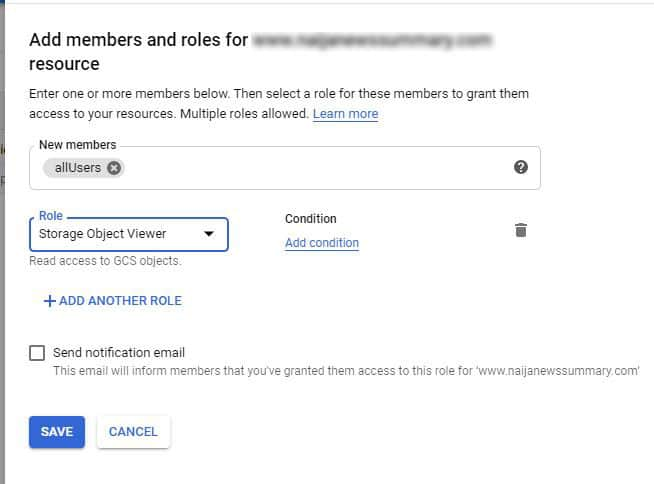
In the New members field, enter allUsers. In the Role dropdown fields, Select Storage -> Storage Object Viewer. Click Save.
Confirm the pop up to allow public access. Notice the value under ‘Public Access‘ now says ‘Public‘.
Step 6: Type your domain name (with the www prefix) in your browser to test the site. Example: www.myawesomesite.com If you follow carefully, your site should be up. Congrats!!
Add SSL(HTTPS) For Security
You will notice in your browser address bar that the site is not behind an SSL(ie no HTTPS or no green padlock).
If SSL is something you want, we have a short guide showing you how to serve your new site with HTTPS using this method.
Check it out here!
There you have it!! You deployed your website on Google for FREE.
Taking it further…
You can update the individual files. Example, you can replace the img/profile.jpg file with your own image by uploading a file to the same location with the same name.
We’ve been hosting websites this way for the past 3 years and I’ve only paid a total of about $0.12 for our my sites. Pretty cool eh?
Want to learn more about Google Cloud? Checkout Pluralsight for awesome Google Cloud courses.
If you find this guide useful, kindly share it with your friends via email, social media so that they can also benefit.
If you need assistance with any of the following steps contact us at:

Translations: French | Spanish | Portuguese
See our other guides:
Comments
comments powered by Disqus